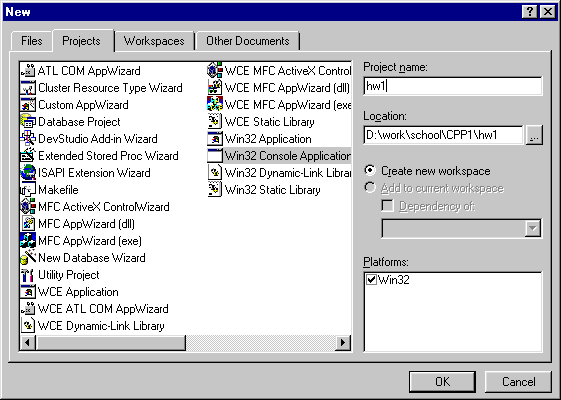
1. Select the File / New menu choice, to get to the
New dialog.
2. In the New dialog, make sure the Projects tab
is selected.
3. In the New dialog, make sure you select the Win32
Console Application item.
4. Change the Location setting if needed, to organize your
projects.
5. Type in the desired name for your new project in the Project
Name field.
The New dialog should now look similar to the following:
6. Click the Ok button
7. In the next dialog, Win32 Console Application - Step 1 of
1, make sure that An Empty Project is selected, and click
Finish.
8. Click Ok at the New Project Information dialog.

Adding a new Source file to your project
1. Open the desired project, if not already open
2. From the File menu choice, select the New sub-menu
3. In the New dialog, make sure the Files tab is highlighted,
and select the C++ Source File item.
4. Check the Add To Project check box.
5. Type the desired filename into the File name field. Note:
You can name it with a .cpp or .c extension here, for C++ or C
programming.
6. Click OK to add the new file. The file is created, and added
to your project. Type in source code in the file as needed.
An example program is:
// This program is Standard C++ compliant
#include <iostream>
using namespace std;
int main()
{
	cout << "Goodbye World" << endl;
	return( 0 );
}
Visual C++ Keyboard shortcuts